引言
得益于SpringBoot这个脚手架封装了很多繁琐的操作,我们只需要通过java -jar一行命令便启动了一个Web服务器;再也不需要搭建tomcat等相关服务,这里我们就来深入探究一下SpringBoot容器启动的原理。
这篇文章是接着上文SpringBoot核心思想及源码解析——自动装配的下篇,主要分析SpringBoot的启动原理,主要包括三部分:启动Jar包、创建Bean容器和内嵌Tomcat的原理,这里我们逐一分析。
1. SpringBoot中jar包启动原理
当我们执行java -jar做了什么?
在oracle官网找到了该命令的描述:
Executes a program encapsulated in a JAR file. The filename argument is the name of a JAR file with a manifest that contains a line in the form Main-Class:classname that defines the class with the public static void main(String[] args) method that serves as your application's starting point.
大概意思就是说:执行封装在 JAR 文件中的程序。 filename 参数是带有MANIFEST的 JAR 文件的名称,该MANIFEST包含 Main-Class:classname 形式的一行,该行定义使用 public static void main(String[] args) 方法作为应用程序启动类。
说人话就是:使用java -jar时会去找jar中的MANIFEST文件中找到Main-Class标明的类,作为启动类启动
我们可以打开我们Springboot打好包的jar文件,可以看到在META-INF文件夹下有一个MANIFEST.MF文件,文件内容如下
Manifest-Version: 1.0
...// 省略无关紧要的内容
Start-Class: com.thoughtworks.mini.springboot.config.OriginStarter
...// 省略无关紧要的内容
Main-Class: org.springframework.boot.loader.JarLauncher
其中Main-Class是JarLauncher,而Start-Class OriginStarter才是我们指定的启动类,这里打开看了才发现实际上java -jar命令只会启动JarLauncher却导致了OriginStarter被执行了,这里面发生了什么?为什么要这样做呢?
原因在于这里是一个fat jar(俗称肥胖包,把所有依赖也打进了jar包),而:
Java没有提供任何标准的方式来加载嵌套的jar文件(简单说:它们本身包含在jar中的jar文件,想要直接运行需要涉及自定义开发)
SpringBoot打包插件将依赖打包
SpringBoot在pom依赖中默认使用以下插件打包:
    <plugin>
        <groupId>org.springframework.boot</groupId>
        <artifactId>spring-boot-maven-plugin</artifactId>
    </plugin>
执行打包命令mvn clean package之后会生成两个文件:
springboot-0.0.1-SNAPSHOT.jar
springboot-0.0.1-SNAPSHOT.jar.original
spring-boot-maven-plugin项目存在于spring-boot-tools目录中,打包时默认执行的是repackag命令,对应代码层面在于RepackageMojo的execute方法,这里不再详细解析,读者感兴趣可以自行跟读。主要的逻辑是:spring-boot-maven-plugin的repackage能够将mvn package生成的软件包,再次打包为可执行的软件包,并将mvn package生成的软件包重命名为*.original
生成新的Jar包目录结构为:
springboot-0.0.1-SNAPSHOT.jar
+---BOOT-INF
|   |   classpath.idx
|   |   layers.idx
|   +---classes
|   |   \---用户程序启动类
|   \---lib
|        第三方依赖包...
+---META-INF
|   |   MANIFEST.MF
|   \---maven
|       \---pom文件相关
\---org
    \---springframework
        \---boot
            \---loader
                SpringBoot程序启动类及其依赖等
简单说就是spring-boot-maven-plugin插件帮我们重新将jar包组织,将依赖也打进了新的jar包内,而且更改了MANIFEST文件的内容,将Main-Class修改为SpringBoot程序启动类
SpingBoot自定义启动类JarLauncher
- 引入相关依赖进行调试
    <dependency>
        <groupId>org.springframework.boot</groupId>
        <artifactId>spring-boot-loader</artifactId>
    </dependency>
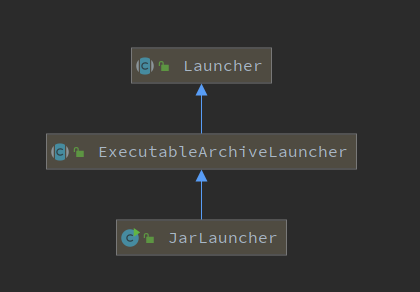
从MANIFEST.MF可以看到Main函数是JarLauncher,下面来分析它的工作流程。JarLauncher存在于spring-boot-loader包,调试的话可以自行引入(调试jar的操作可以直接google),它的继承结构如下:

JarLauncher的逻辑比较简单,具体如下:
public class JarLauncher extends ExecutableArchiveLauncher {
	public JarLauncher() {
	}

	public static void main(String[] args) throws Exception {
		new JarLauncher().launch(args);
	}
}

public abstract class ExecutableArchiveLauncher extends Launcher {
	public ExecutableArchiveLauncher() {
		try {
			// 找到自己所在的jar,并创建Archive
			this.archive = createArchive();
			this.classPathIndex = getClassPathIndex(this.archive);
		}
		catch (Exception ex) {
			throw new IllegalStateException(ex);
		}
	}
}
主入口新建了 JarLauncher 并调用父类 Launcher 中的launch 方法启动程序。在创建JarLauncher时,父类ExecutableArchiveLauncher找到自己所在的jar,并根据资源路径创建Archive(Archive即归档文件,SpringBoot抽象了Archive的概念,JarFileArchive是jar资源的抽象,ExplodedArchive是对文件目录的抽象,统一抽象为资源的逻辑层,方便在对应目录中寻找资源)。
launch(args)这里主要做了两件事:
- 根据JarLauncher的Jar(fat jar)构造JarFileArchive对象,根据jar中的所有资源信息构建了自定义类加载器LaunchedURLClassLoader,该类加载器继承于URLClassLoader
- 使用类加载器加载Jar中的MANIFEST.MF文件,读取Start-Class指向的应用程序启动类,通过反射调用静态主方法,启动用户的应用程序(当遇到需要加载的类时会按照所需使用自定义的类加载器LaunchedURLClassLoader加载jar中jar包)
(具体的逻辑这里不再深究,读者可自行查阅SpringBoot官方文档)
SpringBoot的Jar应用启动流程总结
- SpringBoot应用使用maven插件执行repackage打包后,重新生成了一个Fat jar,它是一个嵌套jar,包含了应用所依赖的jar和Spring-Boot-Leader启动相关的类
- 在使用java -jar命令时,会调用Fat jar中定义的启动类JarLauncher,这个类主要创建了一个自定义的类加载器LaunchedURLClassLoader来加载lib包目录下的所有jar包,并通过反射调用应用程序的启动类
2. SpringBoot启动Bean容器原理
SpringApplication构造逻辑
从jar启动后,我们就进到了我们的应用启动类,对于SpringBoot的应用启动类很简单,就一句代码:
    public static void main(String[] args) {
        SpringApplication.run(OriginStarter.class, args);
    }
对于这一句代码,主要调用的逻辑有:
	public static ConfigurableApplicationContext run(Class<?>[] primarySources, String[] args) {
		// 调用构造方法 创建一个SpringApplication对象
		return new SpringApplication(primarySources).run(args);
	}

	public SpringApplication(ResourceLoader resourceLoader, Class<?>... primarySources) {
		this.resourceLoader = resourceLoader;
		Assert.notNull(primarySources, "PrimarySources must not be null");
		// 将启动类放入primarySources
		this.primarySources = new LinkedHashSet<>(Arrays.asList(primarySources));
		// 根据classpath 下的类,推算当前web应用类型(webFlux, servlet)
		this.webApplicationType = WebApplicationType.deduceFromClasspath();
		// 找到所有spring.factories 文件中的key:org.springframework.context.ApplicationContextInitializer
		setInitializers((Collection) getSpringFactoriesInstances(ApplicationContextInitializer.class));
		// 找到所有spring.factories 文件中的key:org.springframework.context.ApplicationListener
		setListeners((Collection) getSpringFactoriesInstances(ApplicationListener.class));
		// 根据main方法推算出mainApplicationClass
		this.mainApplicationClass = deduceMainApplicationClass();
	}
构造方法主要的逻辑有:
- 将启动类保存(它会做一个核心配置类)
- 设置web应用类型
- 读取了对外扩展的ApplicationContextInitializer和ApplicationListener
- 根据main方法推算所在的mainClass
run方法逻辑
	public ConfigurableApplicationContext run(String... args) {
		// 用来记录启动耗时
		StopWatch stopWatch = new StopWatch();
		stopWatch.start();
		// 接收一个Spring上下文对象
		ConfigurableApplicationContext context = null;
		Collection<SpringBootExceptionReporter> exceptionReporters = new ArrayList<>();
		// 开启了Headless模式 简单说就是 不需要硬件资源 显示器等 的一种服务器模式 提高计算效率和适配性
		configureHeadlessProperty();
		// 读取spring.factroies文件中 SpringApplicationRunListener 的组件, 就是用来发布事件或者运行监听器
		SpringApplicationRunListeners listeners = getRunListeners(args);
		// 发布ApplicationStartingEvent事件,在运行开始时就发送
		listeners.starting();
		try {
			// 根据命令行参数 初始化一个ApplicationArguments
			ApplicationArguments applicationArguments = new DefaultApplicationArguments(args);
			// 预初始化环境:读取环境变量,配置文件信息 (基于监听器实现的)
			ConfigurableEnvironment environment = prepareEnvironment(listeners, applicationArguments);
			// 设置beanInfo 信息 暂时不知道是啥意思
			configureIgnoreBeanInfo(environment);
			// 打印Banner 横幅
			Banner printedBanner = printBanner(environment);
			// 根据web的类型创建ApplicationContext上下文
			context = createApplicationContext();
			exceptionReporters = getSpringFactoriesInstances(SpringBootExceptionReporter.class,
					new Class[] { ConfigurableApplicationContext.class }, context);
			// 预初始化Spring上下文 会将传入的配置类读取成BeanDefinition
			prepareContext(context, environment, listeners, applicationArguments, printedBanner);
			// 加载spring ioc 容器 refresh相当重要 由于是使用AnnotationConfigServletWebServerApplicationContext
			// 启动的spring容器所以springboot对它做了扩展 嵌入Tomcat容器
			refreshContext(context);
			afterRefresh(context, applicationArguments);
			stopWatch.stop();
			if (this.logStartupInfo) {
				new StartupInfoLogger(this.mainApplicationClass).logStarted(getApplicationLog(), stopWatch);
			}
			listeners.started(context);
			callRunners(context, applicationArguments);
		}
		catch (Throwable ex) {
			handleRunFailure(context, ex, exceptionReporters, listeners);
			throw new IllegalStateException(ex);
		}

		try {
			listeners.running(context);
		}
		catch (Throwable ex) {
			handleRunFailure(context, ex, exceptionReporters, null);
			throw new IllegalStateException(ex);
		}
		return context;
	}
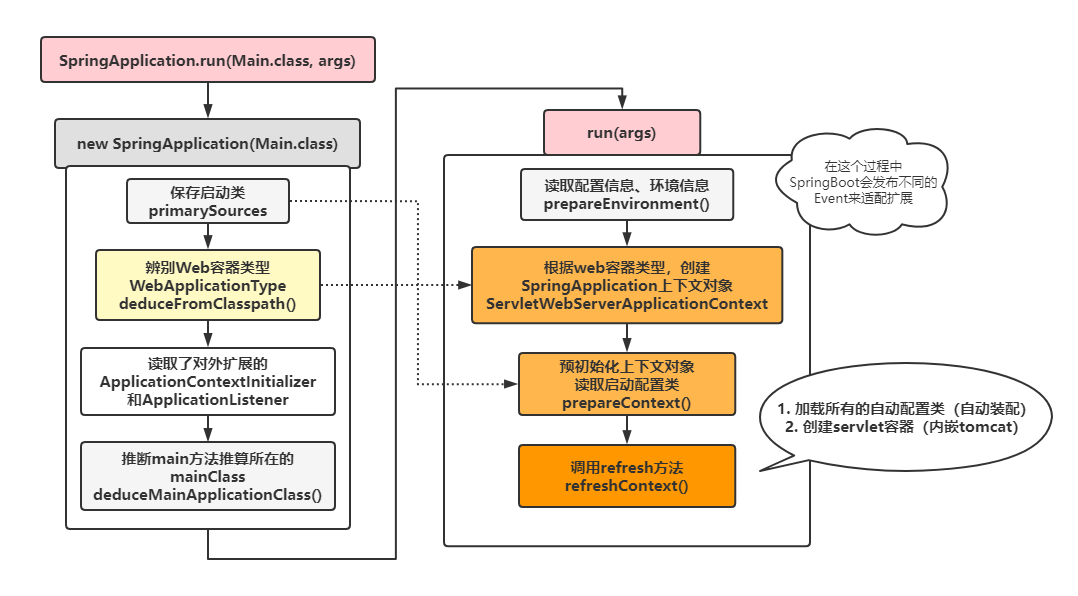
这个代码的层级就很清晰了,一个方法里包含了启动的逻辑,主要有:
- 读取 环境变量、配置信息
- 根据web容器类型,创建SpringApplication上下文对象:ServletWebServerApplicationContext
- 预初始化上下文对象,读取启动配置类
- 调用refresh方法:
- 加载所有的自动配置类
- 创建servlet容器(自动装配 tomcat 容器)
这里发现SpringBoot是和Spring息息相关的,并且扩展了refresh方法创建我们需要的web容器,它的主要流程我们画个图再细细理一下:

3. SpringBoot内嵌Tomcat原理
在学习这个内嵌原理之前,我建议先了解一下内嵌tomcat是怎么流程?首先引入相关依赖包:
        <dependency>
            <groupId>org.apache.tomcat.embed</groupId>
            <artifactId>tomcat-embed-core</artifactId>
        </dependency>
以下是内嵌tomcat最简单的一个示例代码:
    public static void run() throws Exception {
        Tomcat tomcat = new Tomcat();
        tomcat.setBaseDir("target"); // 工作目录

        Connector connector = new Connector();
        connector.setPort(8080); // 端口号
        tomcat.getService().addConnector(connector);


        Context context = tomcat.addContext("/", null);

        // ServletContextInitializer
        context.addServletContainerInitializer((c, servletContext) -> {
            ServletRegistration.Dynamic helloServlet = servletContext.addServlet("ServletName", new HelloServlet());
            helloServlet.addMapping("/hello");
        }, null);


        tomcat.start();  // 启动tomcat
        tomcat.getServer().await(); // 挂起tomcat
    }
相关代码:github链接地址
上面是一个内嵌tomcat的简单示例,主要有以下几步:
- 创建一个Tomcat对象,并设置工作目录(上传文件和编译jsp等临时目录)
- 创建一个Connector对象(主要用于收发Http请求),并设置监听端口号
- 设置上下文根路径,在这个上下文中添加回调函数来注册Servlet(tomcat在容器启动之后会回调此方法),并添加映射路径
- 启动tomcat,监听服务请求并挂起
(Servlet是J2EE 规范中的一种,Servlet接口定义的是一套处理网络请求的规范)
搞懂了内嵌Tomcat的基本操作,我们再看SpringBoot的逻辑,主要关注点:1. 创建的tomcat;2. 注册的DispatcherServlet;这里先回到ServletWebServerApplicationContext中的onRefresh方法:
	@Override
	protected void onRefresh() {
		super.onRefresh();
		try {
			// 创建Web容器
			createWebServer();
		}
		catch (Throwable ex) {
			throw new ApplicationContextException("Unable to start web server", ex);
		}
	}
1. 创建Tomcat容器
ServletWebServerApplicationContext.onRefresh()这个方法覆写了AbstractApplicationContext中的空方法(ApplicationContext就什么都没有做),在调用父类的onRefresh方法后,使用createWebServer创建了Web容器
	private void createWebServer() {
		WebServer webServer = this.webServer;
		// 内置的tomcat servletContext 为null 如果为外置的tomcat 则此处非null
		ServletContext servletContext = getServletContext();
		if (webServer == null && servletContext == null) {
			// 从容器中获得一个ServletWebServerFactory 此处来自于SpringBoot中的自动装配
			ServletWebServerFactory factory = getWebServerFactory();
			// 调用factory的getWebServer方法构造一个web容器,这里的参数引用了一个方法的返回值 返回一个ServletContextInitializer引用
			this.webServer = factory.getWebServer(getSelfInitializer());
		}
		// 外置tomcat 走这里
		else if (servletContext != null) {
			try {
				// 手动调用onStartup注册servlet容器
				getSelfInitializer().onStartup(servletContext);
			}
			catch (ServletException ex) {
				throw new ApplicationContextException("Cannot initialize servlet context", ex);
			}
		}
		initPropertySources();
	}
这里我们可以来看一下getWebServerFactory()方法的实现,因为onRefresh()在调用AbstractApplicationContext.invokeBeanFactoryPostProcessors方法之后,所有的配置类已经解析完成,我们可以从容器中拿到自动装配的TomcatServletWebServerFactory
	protected ServletWebServerFactory getWebServerFactory() {
		// Use bean names so that we don't consider the hierarchy
		// 从容器中获取ServletWebServerFactory 这里来自于ServletWebServerFactoryConfiguration自动装配
		String[] beanNames = getBeanFactory().getBeanNamesForType(ServletWebServerFactory.class);
		if (beanNames.length == 0) {
			throw new ApplicationContextException("Unable to start ServletWebServerApplicationContext due to missing "
					+ "ServletWebServerFactory bean.");
		}
		if (beanNames.length > 1) {
			throw new ApplicationContextException("Unable to start ServletWebServerApplicationContext due to multiple "
					+ "ServletWebServerFactory beans : " + StringUtils.arrayToCommaDelimitedString(beanNames));
		}
		// 调用getBean生产Bean
		return getBeanFactory().getBean(beanNames[0], ServletWebServerFactory.class);
	}
其中ServletWebServerFactoryConfiguration中自动装配的代码如下:
	@Configuration(proxyBeanMethods = false)
	@ConditionalOnClass({ Servlet.class, Tomcat.class, UpgradeProtocol.class })
	@ConditionalOnMissingBean(value = ServletWebServerFactory.class, search = SearchStrategy.CURRENT)
	static class EmbeddedTomcat {
		@Bean
		TomcatServletWebServerFactory tomcatServletWebServerFactory(
				ObjectProvider<TomcatConnectorCustomizer> connectorCustomizers,
				ObjectProvider<TomcatContextCustomizer> contextCustomizers,
				ObjectProvider<TomcatProtocolHandlerCustomizer<?>> protocolHandlerCustomizers) {
			TomcatServletWebServerFactory factory = new TomcatServletWebServerFactory();
			factory.getTomcatConnectorCustomizers()
					.addAll(connectorCustomizers.orderedStream().collect(Collectors.toList()));
			factory.getTomcatContextCustomizers()
					.addAll(contextCustomizers.orderedStream().collect(Collectors.toList()));
			factory.getTomcatProtocolHandlerCustomizers()
					.addAll(protocolHandlerCustomizers.orderedStream().collect(Collectors.toList()));
			return factory;
		}
	}
这里我们可以看到,从自动装配中获益的Tomcat自动装配:
	@Override
	public WebServer getWebServer(ServletContextInitializer... initializers) {
		// 构造一个Tomcat容器
		Tomcat tomcat = new Tomcat();
		File baseDir = (this.baseDirectory != null) ? this.baseDirectory : createTempDir("tomcat");
		tomcat.setBaseDir(baseDir.getAbsolutePath());
		Connector connector = new Connector(this.protocol);
		tomcat.getService().addConnector(connector);
		customizeConnector(connector);
		tomcat.setConnector(connector);
		tomcat.getHost().setAutoDeploy(false);
		configureEngine(tomcat.getEngine());
		for (Connector additionalConnector : this.additionalTomcatConnectors) {
			tomcat.getService().addConnector(additionalConnector);
		}
		// 配置servlet回调函数
		prepareContext(tomcat.getHost(), initializers);
		return getTomcatWebServer(tomcat);
	}
2. 注册DispatcherServlet
到这里已经将tomcat容器创建出来了,我们进行第二步,查看DispatcherServlet在哪里注入的,回到createWebServer()方法中的getSelfInitializer()方法:
	private org.springframework.boot.web.servlet.ServletContextInitializer getSelfInitializer() {
		return this::selfInitialize;
	}

	private void selfInitialize(ServletContext servletContext) throws ServletException {
		prepareWebApplicationContext(servletContext);
		registerApplicationScope(servletContext);
		WebApplicationContextUtils.registerEnvironmentBeans(getBeanFactory(), servletContext);
		// 从获取所有的ServletContextInitializer 调用它们的onStartup方法
		for (ServletContextInitializer beans : getServletContextInitializerBeans()) {
			beans.onStartup(servletContext);
		}
	}
这里我们可以回忆起SpringBoot注册中Servlet的方式:ServletRegistrationBean:
@Bean
public ServletRegistrationBean registerServlet() {
    ServletRegistrationBean servletRegistrationBean = new ServletRegistrationBean(
            new RegisterServlet(), "/registerServlet");
    servletRegistrationBean.addInitParameter("name", "javastack");
    servletRegistrationBean.addInitParameter("sex", "man");
    return servletRegistrationBean;
}
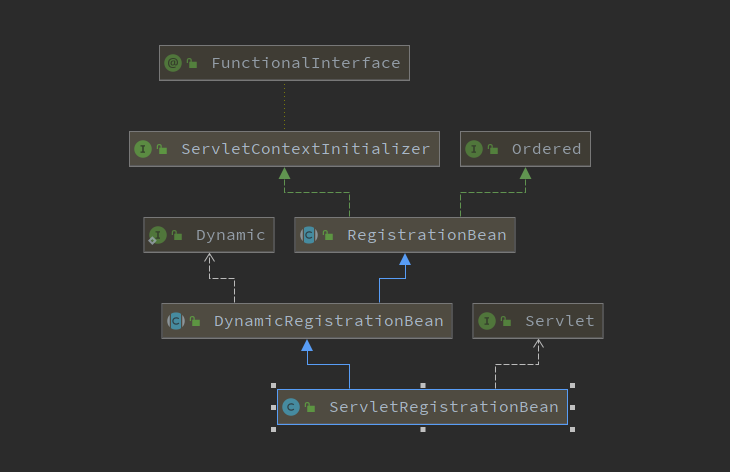
它和ServletContextInitializer的关系如下:

就是说,ServletRegistrationBean继承自ServletContextInitializer,我可以直接用idea搜索DispatcherServletAuto*即可发现DispatcherServlet已经被DispatcherServletAutoConfiguration这个配置类自动装配了,它的逻辑如下:
	@Configuration(proxyBeanMethods = false)
	@Conditional(DefaultDispatcherServletCondition.class)
	@ConditionalOnClass(ServletRegistration.class)
	@EnableConfigurationProperties(WebMvcProperties.class)
	protected static class DispatcherServletConfiguration { //自动配置DispatcherServlet
		@Bean(name = DEFAULT_DISPATCHER_SERVLET_BEAN_NAME)
		public DispatcherServlet dispatcherServlet(WebMvcProperties webMvcProperties) {
			DispatcherServlet dispatcherServlet = new DispatcherServlet();
			dispatcherServlet.setDispatchOptionsRequest(webMvcProperties.isDispatchOptionsRequest());
			dispatcherServlet.setDispatchTraceRequest(webMvcProperties.isDispatchTraceRequest());
			dispatcherServlet.setThrowExceptionIfNoHandlerFound(webMvcProperties.isThrowExceptionIfNoHandlerFound());
			dispatcherServlet.setPublishEvents(webMvcProperties.isPublishRequestHandledEvents());
			dispatcherServlet.setEnableLoggingRequestDetails(webMvcProperties.isLogRequestDetails());
			return dispatcherServlet;
		}
	}

	@Configuration(proxyBeanMethods = false)
	@Conditional(DispatcherServletRegistrationCondition.class)
	@ConditionalOnClass(ServletRegistration.class)
	@EnableConfigurationProperties(WebMvcProperties.class)
	@Import(DispatcherServletConfiguration.class)
	protected static class DispatcherServletRegistrationConfiguration { //自动配置ServletRegistrationBean注册Servlet

		@Bean(name = DEFAULT_DISPATCHER_SERVLET_REGISTRATION_BEAN_NAME)
		@ConditionalOnBean(value = DispatcherServlet.class, name = DEFAULT_DISPATCHER_SERVLET_BEAN_NAME)
		public DispatcherServletRegistrationBean dispatcherServletRegistration(DispatcherServlet dispatcherServlet,
				WebMvcProperties webMvcProperties, ObjectProvider<MultipartConfigElement> multipartConfig) {
			DispatcherServletRegistrationBean registration = new DispatcherServletRegistrationBean(dispatcherServlet,
					webMvcProperties.getServlet().getPath());
			registration.setName(DEFAULT_DISPATCHER_SERVLET_BEAN_NAME);
			registration.setLoadOnStartup(webMvcProperties.getServlet().getLoadOnStartup());
			multipartConfig.ifAvailable(registration::setMultipartConfig);
			return registration;
		}
	}
而ServletContextInitializer的方法入口为:onStartup,这个类的实现是一个模板方法,其中注册Servlet的逻辑为:
public abstract class RegistrationBean implements ServletContextInitializer, Ordered {
	@Override // ServletContextInitializer接口的实现
	public final void onStartup(ServletContext servletContext) throws ServletException {
		// 获取Servlet的名字
		String description = getDescription();
		if (!isEnabled()) {
			logger.info(StringUtils.capitalize(description) + " was not registered (disabled)");
			return;
		}
		// 调用register方法,这里可以注册Filter、Servlet 分别对应不同的实现
		register(description, servletContext);
	}
}

public abstract class DynamicRegistrationBean<D extends Registration.Dynamic> extends RegistrationBean {
	@Override // 覆写RegistrationBean中的register方法
	protected final void register(String description, ServletContext servletContext) {
		// 调用addRegistration方法注册 Filter、Servlet 分别对应不同的实现
		D registration = addRegistration(description, servletContext);
		if (registration == null) {
			logger.info(StringUtils.capitalize(description) + " was not registered (possibly already registered?)");
			return;
		}
		// 调用configure 配置 Filter、Servlet 分别对应不同的实现
		configure(registration);
	}
}

// 这里仅关注Servlet的部分
public class ServletRegistrationBean<T extends Servlet> extends DynamicRegistrationBean<ServletRegistration.Dynamic> {
	@Override // 覆写DynamicRegistrationBean中的实现
	protected ServletRegistration.Dynamic addRegistration(String description, ServletContext servletContext) {
		String name = getServletName();
		// 注册Servlet
		return servletContext.addServlet(name, this.servlet);
	}
}
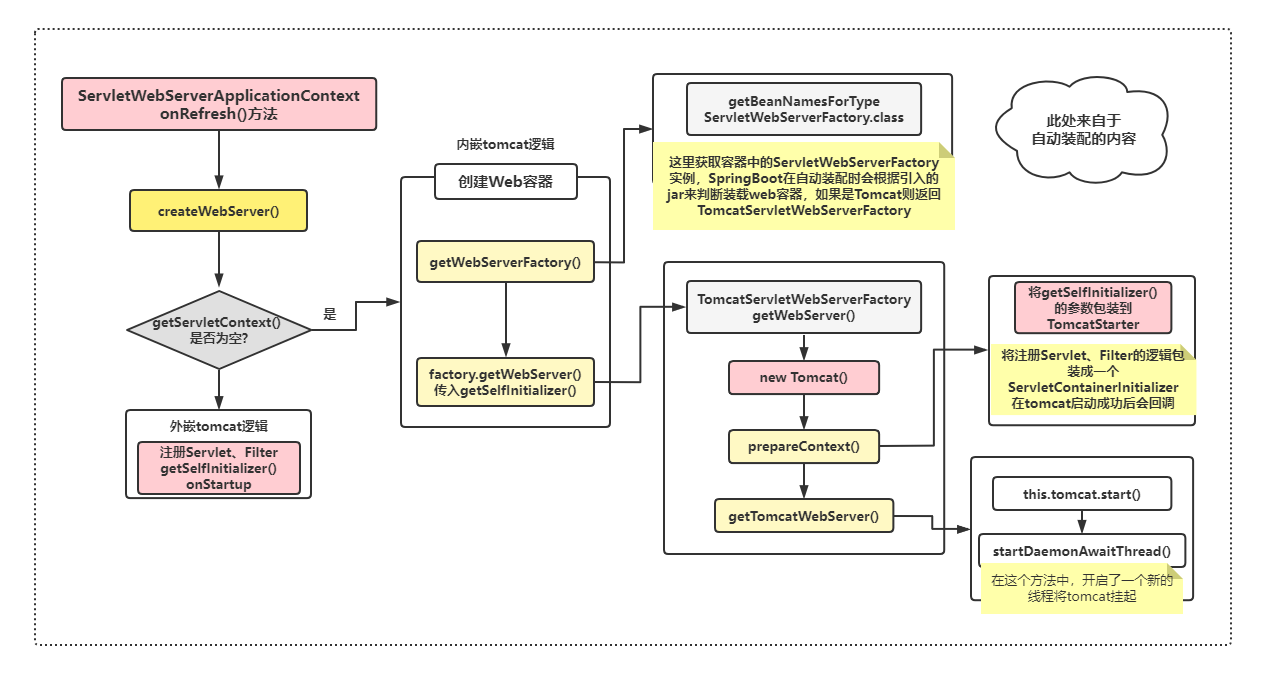
至此,SpringBoot已经将DispatcherServlet注册到Tomcat容器里了,我们也可以正常访问我们的后台程序,这里在画一张图进行一个小节:

上面只包含了部分主逻辑,可以按照这个线路来继续深入学习,主要包含两大块:1. 创建web容器 2. 注册Servlet。
小节
本文主要是从SpringBoot打包Jar原理,装配Bean容器,再到内嵌tomcat原理中逐一解析:
- SpringBoot 将依赖打进了fat jar中之后,虽然java提供任何标准的方式来加载嵌套的jar文件,但是SpringBoot重写了fat jar中的主函数入口,从而封装了自定义的类加载器来解决这一问题,再通过反射调用用户的程序类,完成SpringBoot的fat jar启动应用程序。
- 在应用程序入口,逐渐解析传入的参数,也根据当前引入依赖的类型而创建了Spring的Servlet Bean容器
- 这个Servlet Bean容器唯一的区别就是在ApplicationContext中覆写了onRefresh方法(SpringBoot根据引入的starter自动装配Web容器所需要的Bean),主要逻辑是:根据Servlet容器类型创建对应的Web容器,此处默认为tomcat,完成容器的内嵌tomcat启动